In this step-by-step guide, we will build a Contact List App for the Android OS.
A Contact List App is a mobile Application where the user adds Telephone contacts through a form provided and these contacts and then displayed on the screen of the phone.
For our tutorial, we shall enable the user to add other details as well i.e. Contact name and then the Contact’s email which will all be displayed under the same contact.
By the end of this step-by-step guide, you will be able to create a Contact list app for Android phones by yourself, you will have a better understanding of how to design mobile app User Interfaces in Android Studio using Extensible Markup Language (XML), you will be able to use Intents to pass data from one activity (page) to another and as well how to retrieve back data from another activity to the previous activity, you will learn how to use the ListView UI component in Android studio, and you will have a challenge to do at the end of the step-by-step guide.
Prerequisites
To gain a lot from this step-by-step guide, you should consider the following:
Have a basic understanding of the Java programming language or Understand OOP even though for other languages.
Have Android Studio's latest version installed on your Computer.
Have the appetite to create interactive mobile apps for mobile phones.
Without wasting any other second, let’s get into the real work now.
Setting up the project
Open your Android Studio desktop application, and on the display screen, click on New Project. You should get to a window that looks like below;
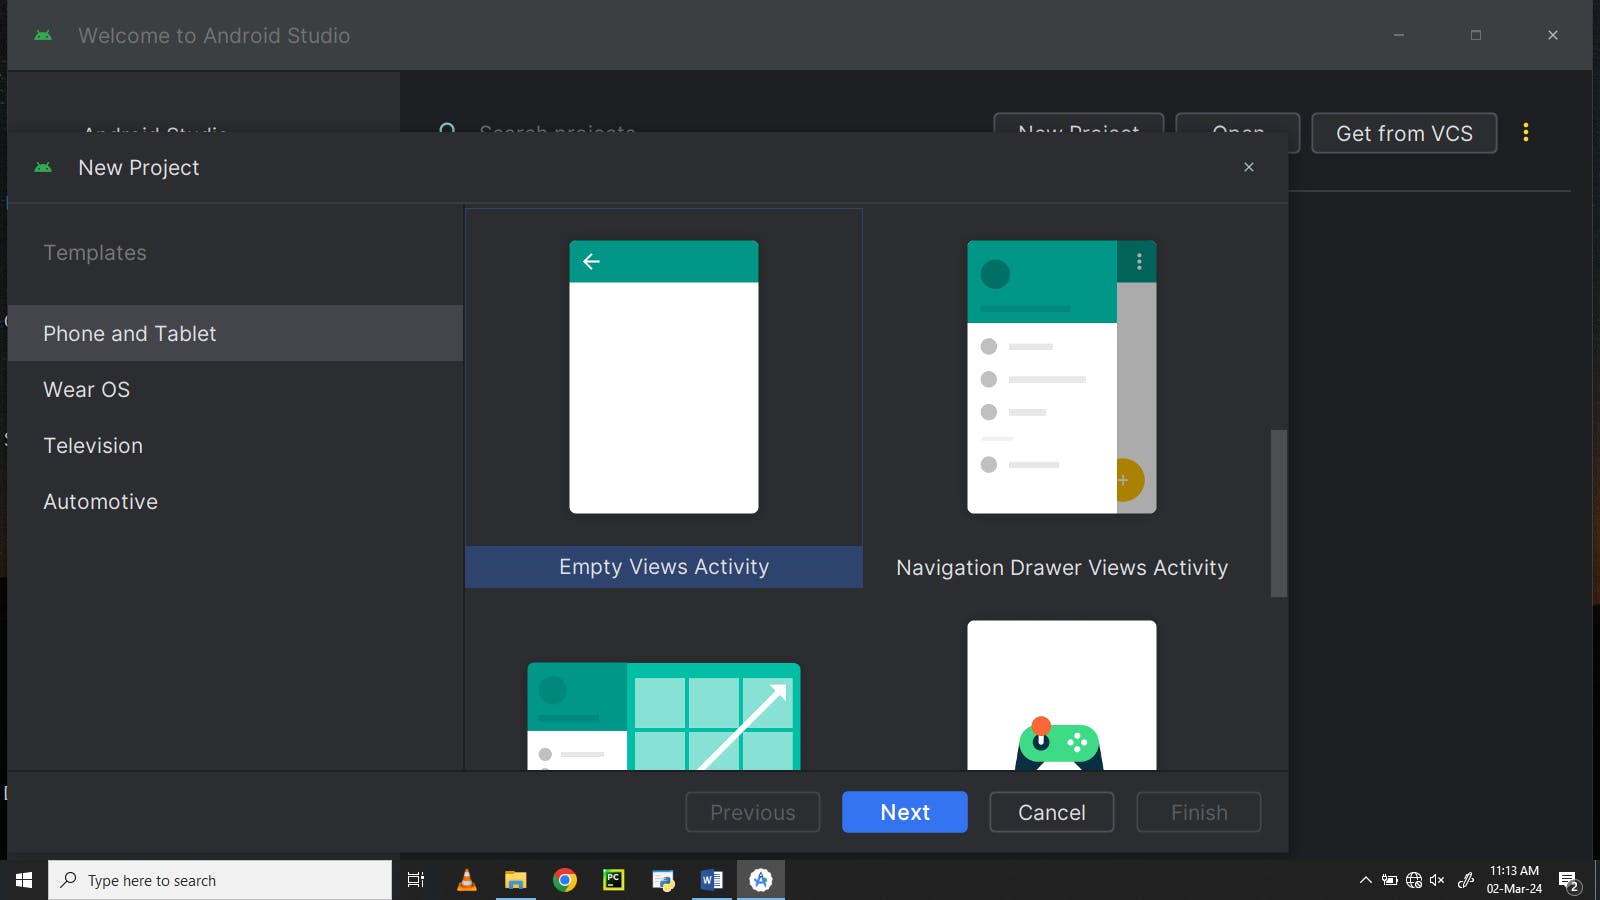
Scroll and then click on Empty Views Activity then click next. You should be having a window like the one shown below;
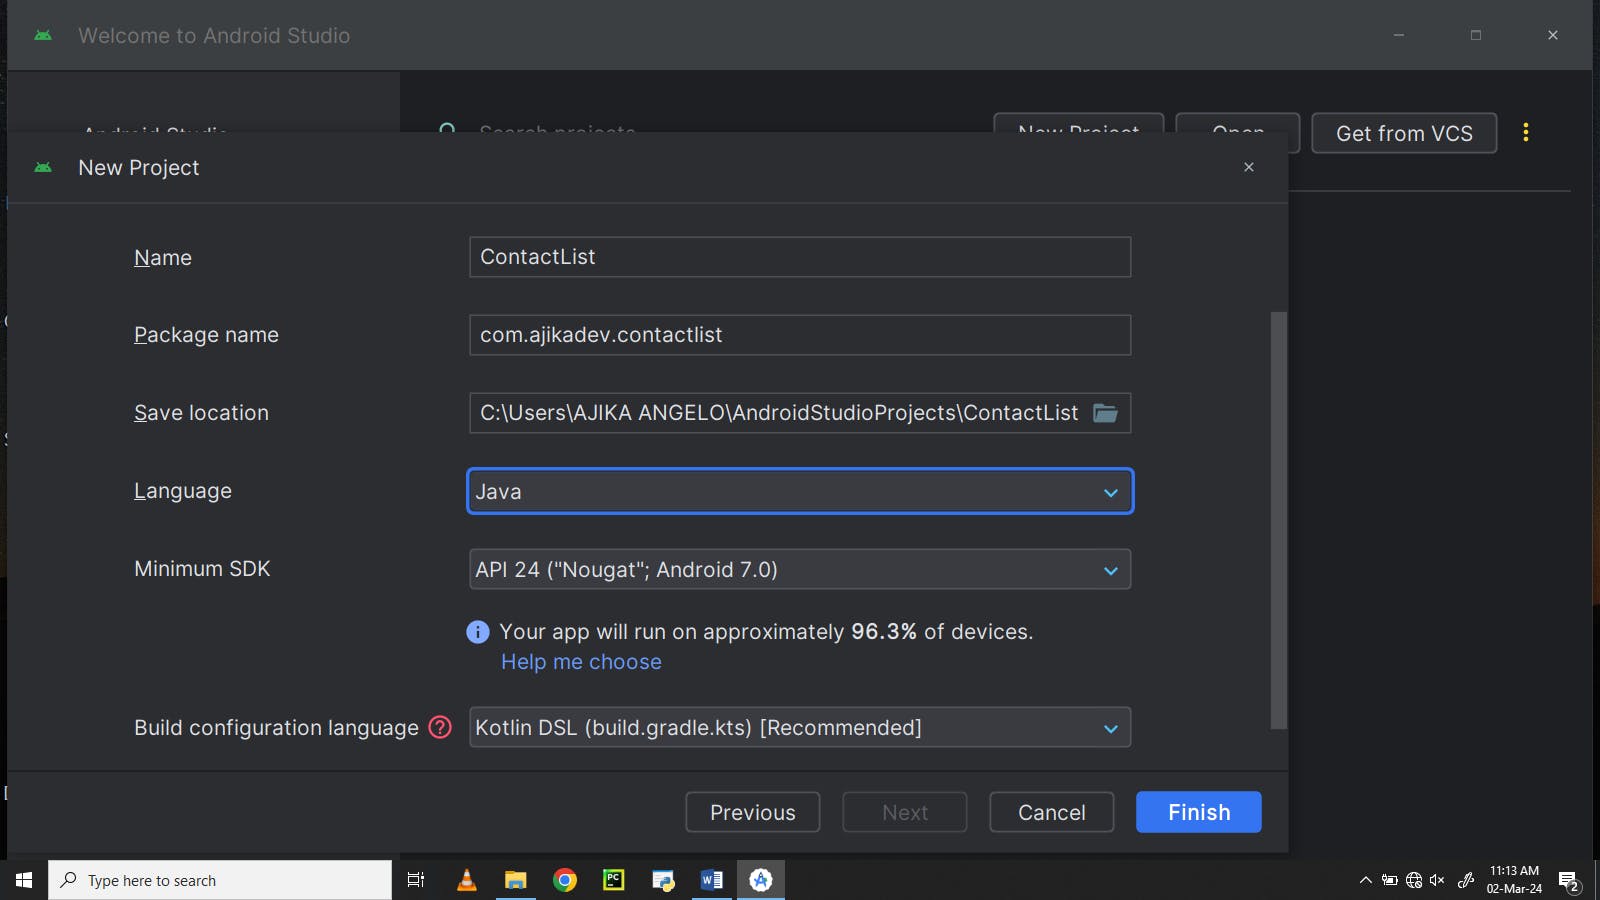
Set the name of your application as per your choice, set the package name or use the default one, change the language from Kotlin to Java, and then click on Finish.
Be patient as it will take some time for the screen to load as below. This is dependent on the RAM size of your PC, so don’t worry.
Designing the User Interface
Starting on the process of development, let’s get to design the user interface of our mobile app.
From the top bar of the open window, click on the file activity_main.xml that is adjacent to the open file MainActivity.java.
You should have a screen displayed as below. This is where we are going to handle our design tasks;
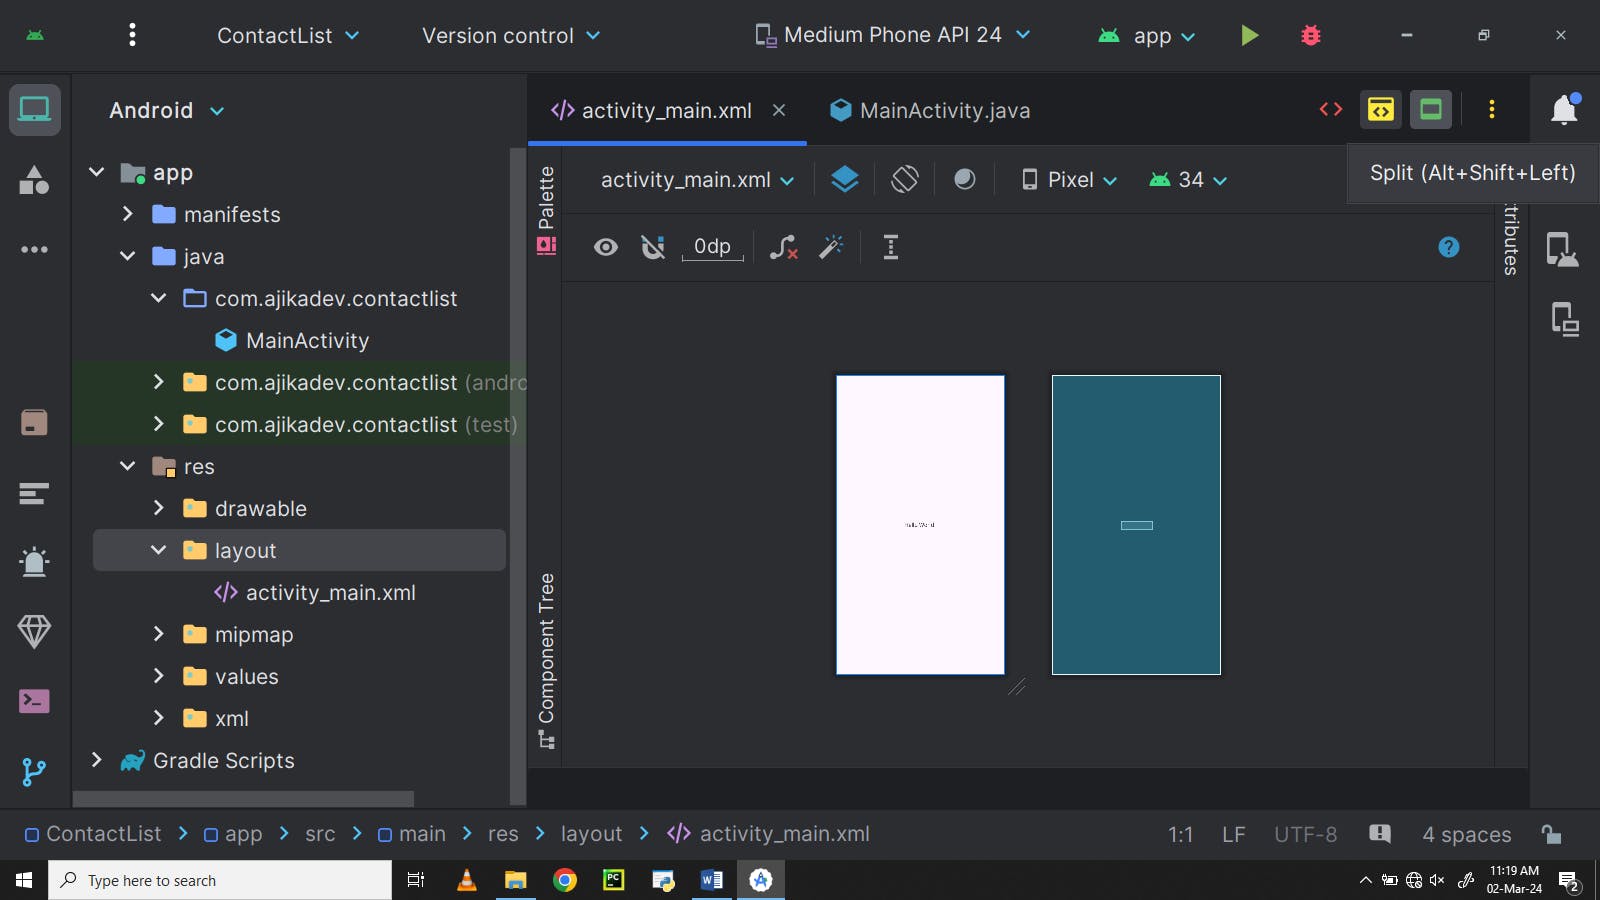
To display the XML code side by side with the design, click on the yellow button in the top right corner shown below;
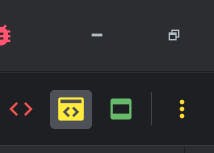
You should have a screen like this;
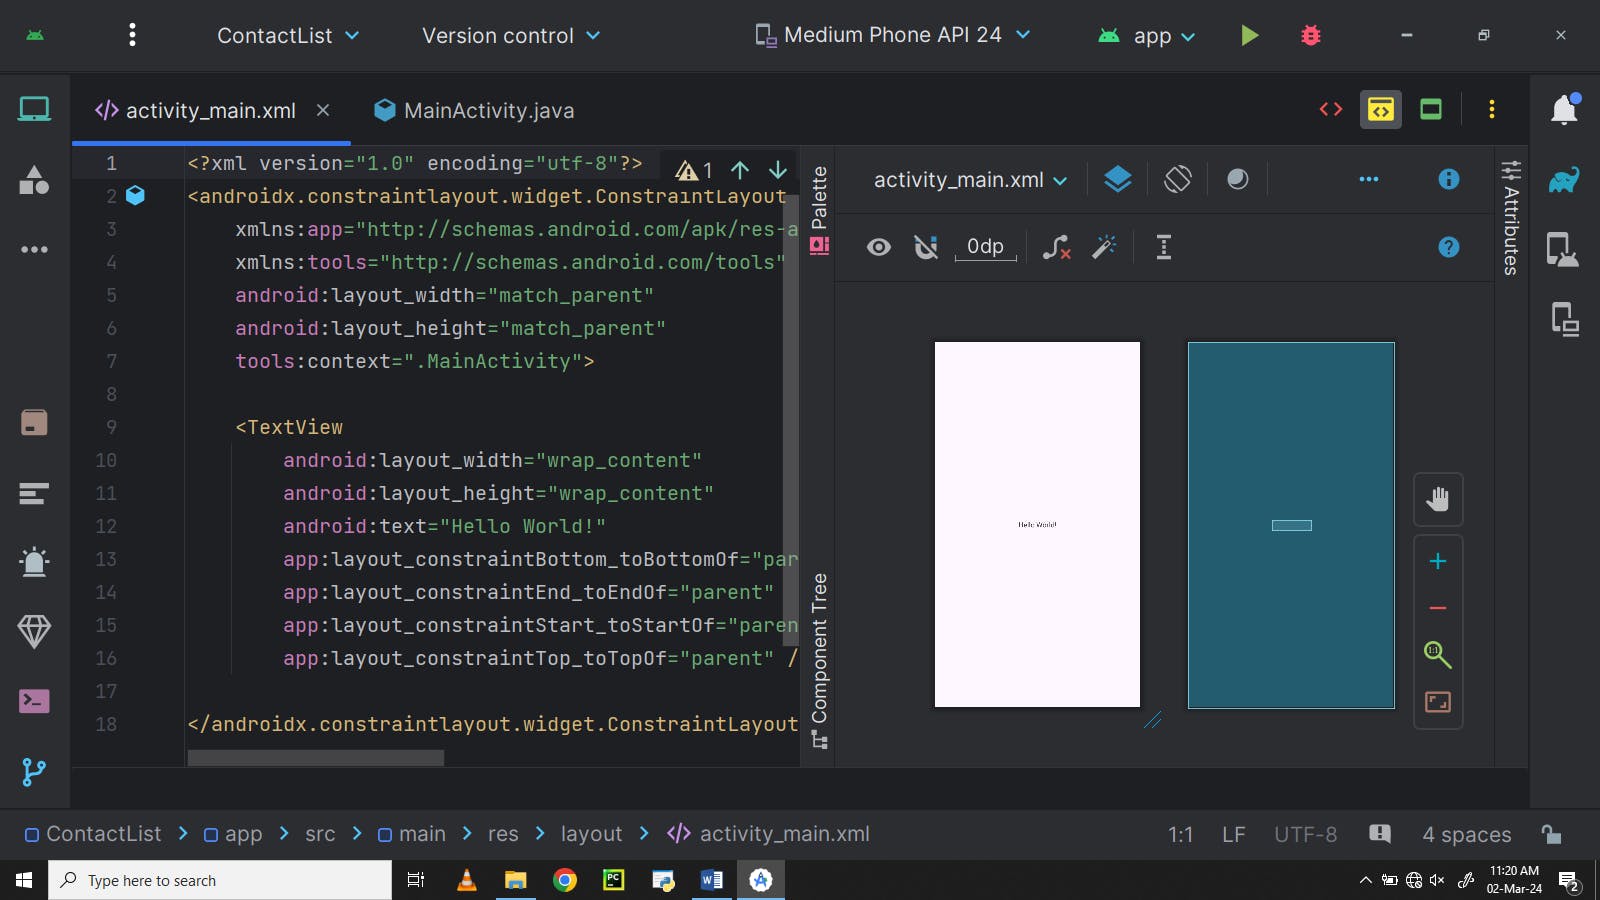
Copy the XML code below and replace it with the XML code in your activity_main.xml file.
<?xml version="1.0" encoding="utf-8"?>
<androidx.constraintlayout.widget.ConstraintLayout xmlns:android="http://schemas.android.com/apk/res/android"
    xmlns:app="http://schemas.android.com/apk/res-auto"
    xmlns:tools="http://schemas.android.com/tools"
    android:layout_width="match_parent"
    android:layout_height="match_parent"
    tools:context=".MainActivity">

    <Button
        android:id="@+id/button"
        android:layout_width="wrap_content"
        android:layout_height="wrap_content"
        android:layout_margin="25dp"
        android:onClick="onClick"
        android:text="Add Contact"
        app:layout_constraintEnd_toEndOf="parent"
        app:layout_constraintStart_toStartOf="parent"
        app:layout_constraintTop_toTopOf="parent" />


    <TextView
        android:id="@+id/textView"
        android:layout_width="wrap_content"
        android:layout_height="wrap_content"
        android:text="Contacts"
        android:textFontWeight="@integer/material_motion_duration_medium_2"
        app:layout_constraintBottom_toTopOf="@+id/listView"
        app:layout_constraintEnd_toEndOf="@+id/button"
        app:layout_constraintStart_toStartOf="@+id/button"
        app:layout_constraintTop_toBottomOf="@+id/button"
        tools:ignore="UnknownId" />

    <ListView
        android:id="@+id/list"
        android:layout_width="match_parent"
        android:layout_height="match_parent"
        android:layout_marginTop="116dp"
        app:layout_constraintTop_toBottomOf="@+id/button"
        tools:layout_editor_absoluteX="1dp"
        tools:ignore="MissingConstraints" />

</androidx.constraintlayout.widget.ConstraintLayout
You should now have a screen as shown below.
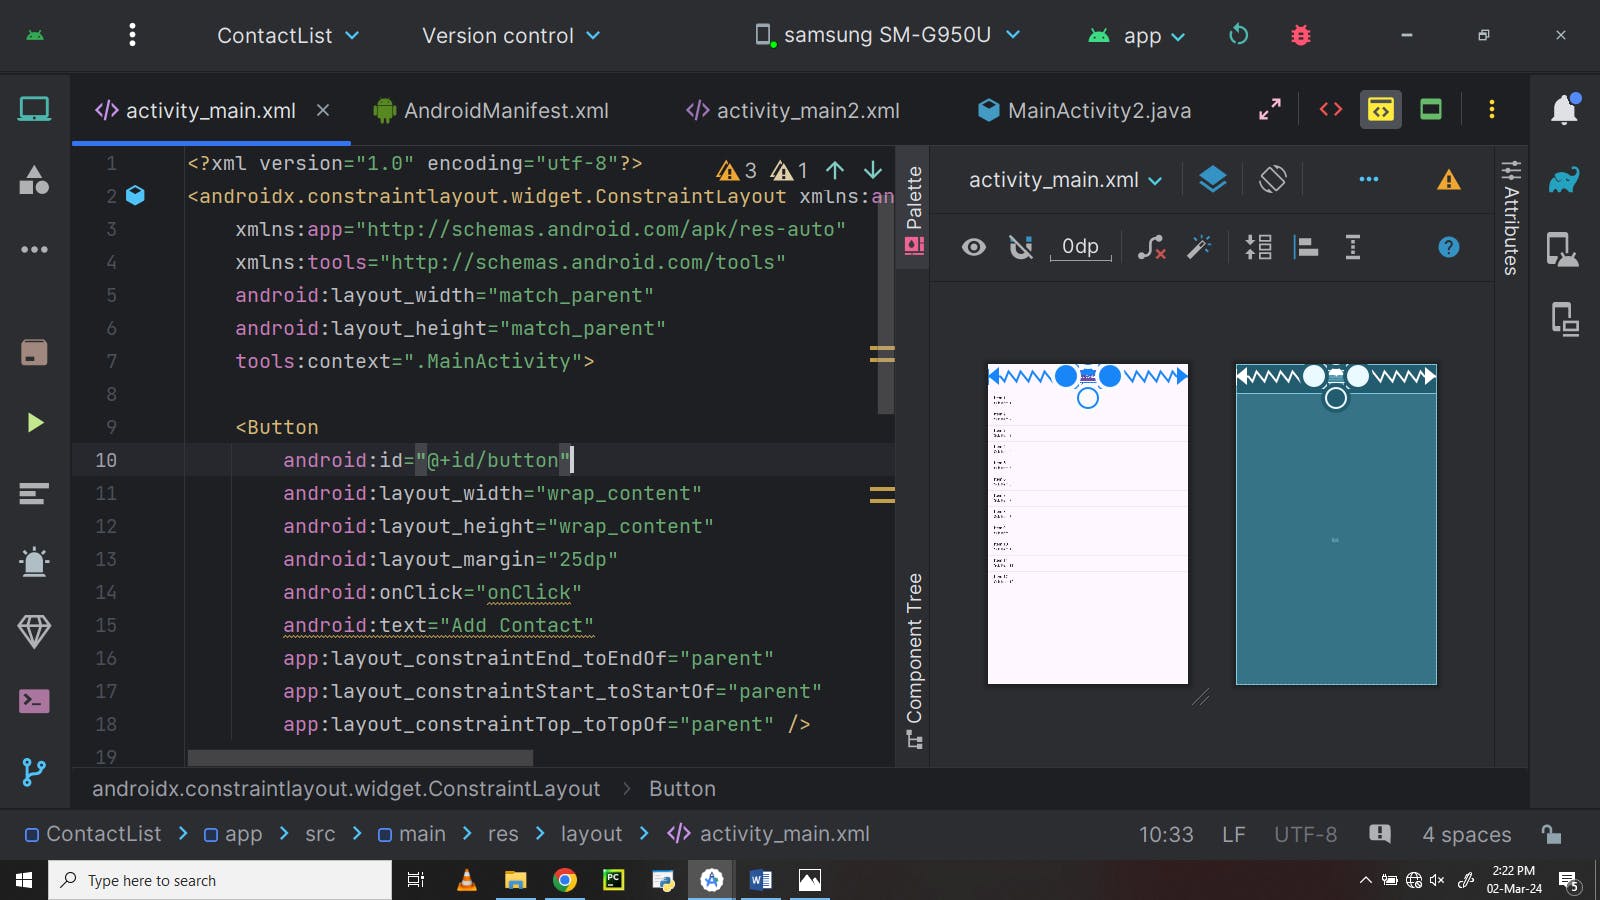
You must have noticed that the design on the right panel has changed and it’s kind of appealing and identifiable with a button labeled 'Add Contacts' and the contacts list view of labels ‘items’ just below it.
The list display is brought about by the ListView UI component in the XML file, amazing right?
In the project/file explorer on the left sidebar, right-click on the MainActivity.java file, go to New, then click on Activity, and click on Empty views Activity. You must have a screen as shown below.
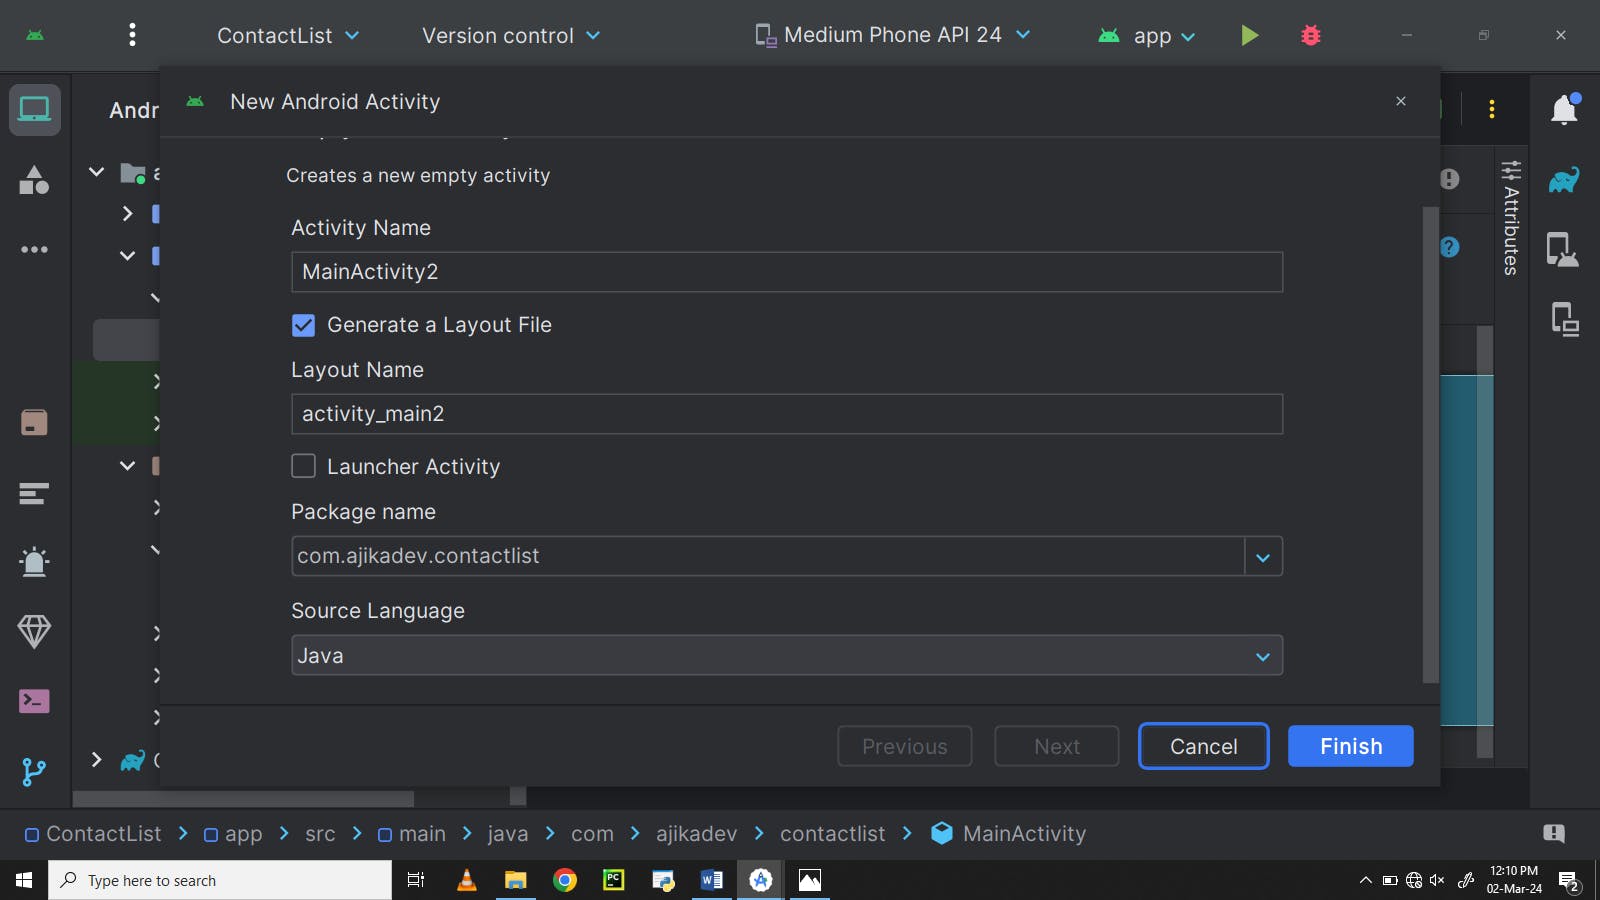
You can name this activity with a name of your choice or even maintain the default name, MainActivity2, as we are going to do here.
When you click Finish, the new activity, MainActivity2.java together with its XML file activity_main2.xml are created and opened.
Copy the code given below and replace it with the XML code in the activity_main2.xml file.
<?xml version="1.0" encoding="utf-8"?>
<androidx.constraintlayout.widget.ConstraintLayout xmlns:android="http://schemas.android.com/apk/res/android"
    xmlns:app="http://schemas.android.com/apk/res-auto"
    xmlns:tools="http://schemas.android.com/tools"
    android:layout_width="match_parent"
    android:layout_height="match_parent"
    tools:context=".MainActivity2">


    <EditText
        android:id="@+id/editEmail"
        android:layout_width="wrap_content"
        android:layout_height="wrap_content"
        android:layout_marginTop="160dp"
        android:ems="100"
        android:inputType="text"
        android:text="Email"
        app:layout_constraintEnd_toEndOf="parent"
        app:layout_constraintTop_toBottomOf="@+id/textView2" />

    <EditText
        android:id="@+id/editTextPhone"
        android:layout_width="wrap_content"
        android:layout_height="wrap_content"
        android:layout_marginTop="76dp"
        android:ems="100"
        android:inputType="text"
        android:text="Phone"
        app:layout_constraintEnd_toEndOf="parent"
        app:layout_constraintHorizontal_bias="1.0"
        app:layout_constraintStart_toStartOf="parent"
        app:layout_constraintTop_toBottomOf="@+id/textView2" />

    <TextView
        android:id="@+id/textView2"
        android:layout_width="wrap_content"
        android:layout_height="wrap_content"
        android:text="Enter Contact Details"
        android:textSize="30sp"
        app:layout_constraintStart_toStartOf="parent"
        app:layout_constraintTop_toTopOf="parent" />

    <EditText
        android:id="@+id/editName"
        android:layout_width="wrap_content"
        android:layout_height="wrap_content"
        android:layout_marginTop="4dp"
        android:ems="100"
        android:inputType="text"
        android:text="Name"
        app:layout_constraintEnd_toEndOf="parent"
        app:layout_constraintStart_toStartOf="parent"
        app:layout_constraintTop_toBottomOf="@+id/textView2" />

    <Button
        android:id="@+id/button2"
        android:layout_width="wrap_content"
        android:layout_height="wrap_content"
        android:layout_marginTop="56dp"
        android:text="Save Contact"
        app:layout_constraintEnd_toEndOf="@+id/editEmail"
        app:layout_constraintHorizontal_bias="0.454"
        app:layout_constraintStart_toStartOf="@+id/editEmail"
        app:layout_constraintTop_toBottomOf="@+id/editEmail" />

</androidx.constraintlayout.widget.ConstraintLayout>
The UI design layout must change as shown below.
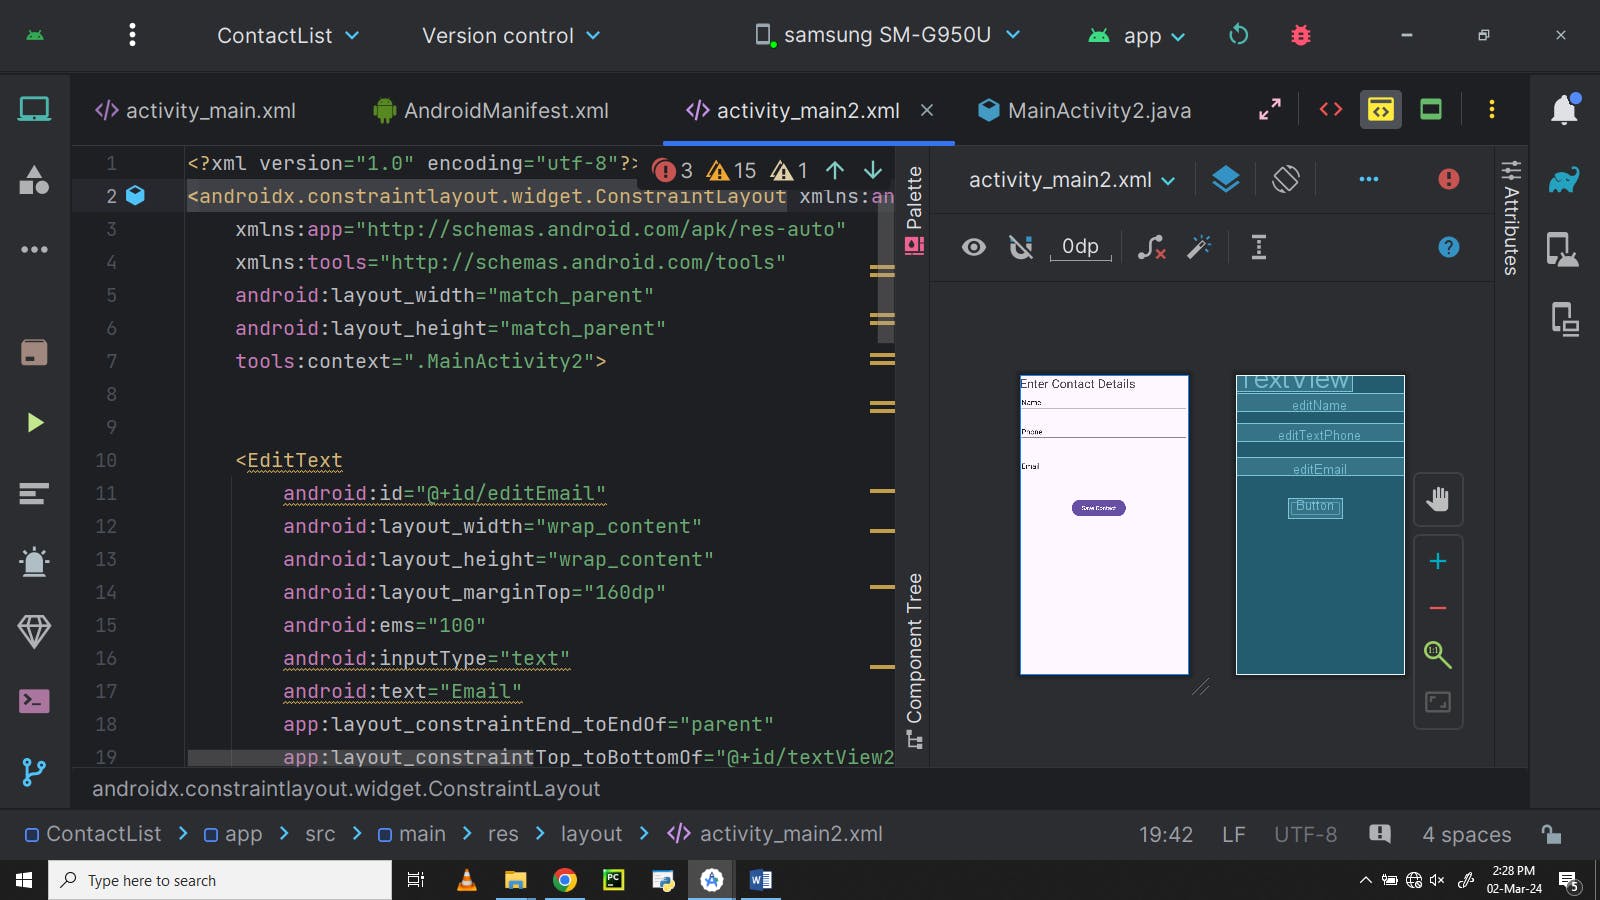
And with that, we are done with designing our UI layouts.
One more important thing to do is to ensure that these UI layouts are linked. This is done using Intents. To do that, go to the file explorer, open manifest, and the file, AndroidManifest.xml is opened as shown below;
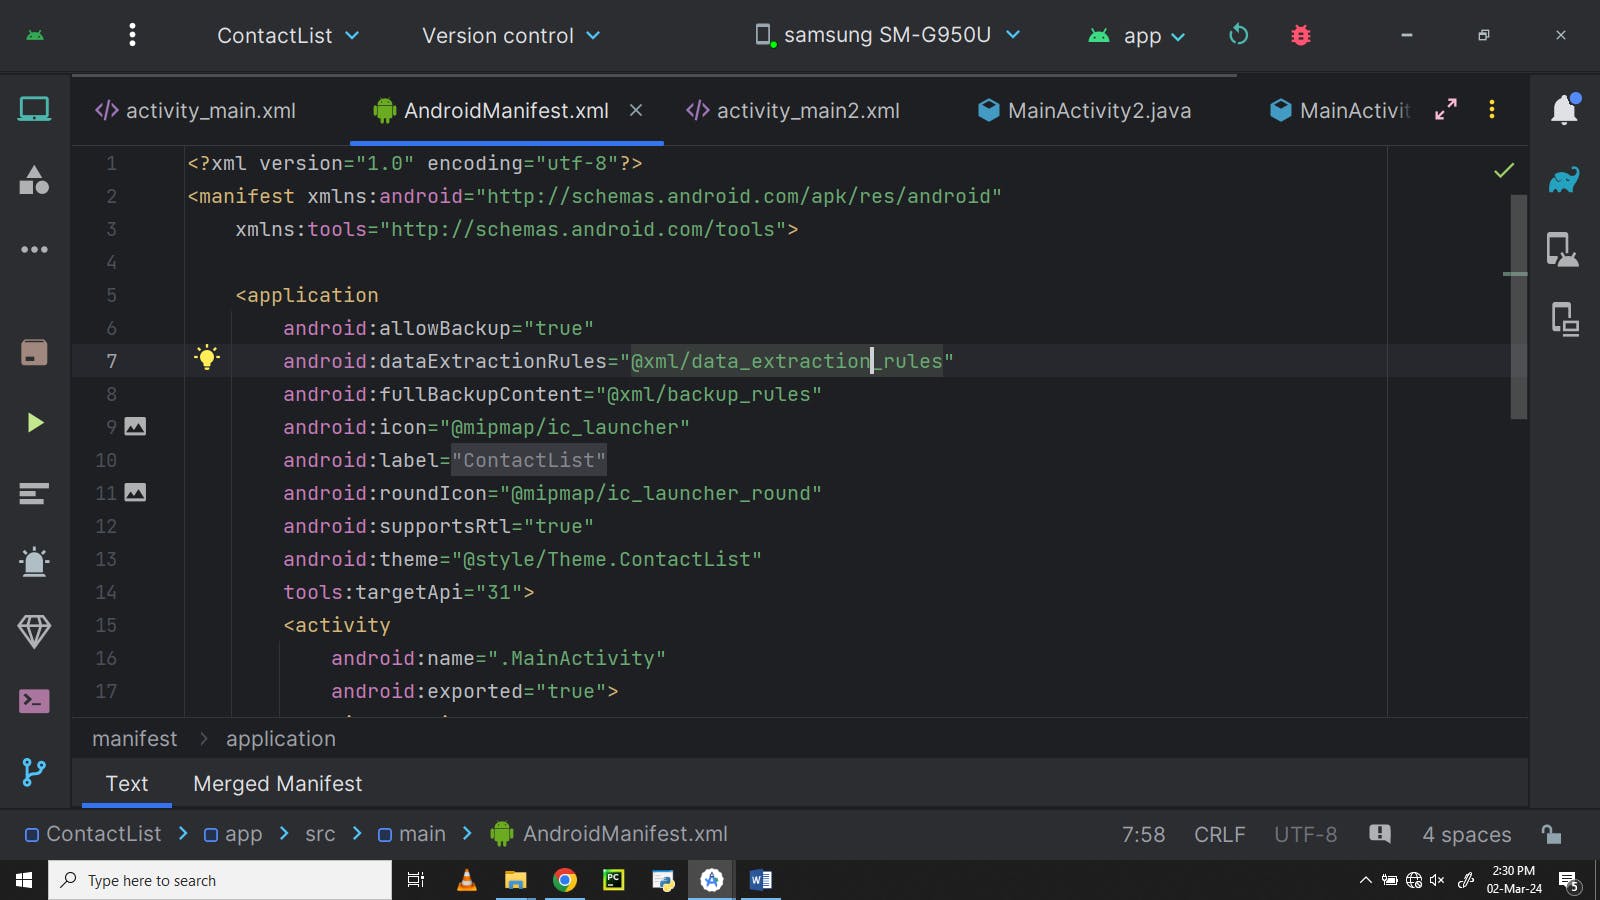
Copy the code below and replace it with the code in the AndroidManifest.xml file.
<?xml version="1.0" encoding="utf-8"?>
<manifest xmlns:android="http://schemas.android.com/apk/res/android"
    xmlns:tools="http://schemas.android.com/tools">

    <application
        android:allowBackup="true"
        android:dataExtractionRules="@xml/data_extraction_rules"
        android:fullBackupContent="@xml/backup_rules"
        android:icon="@mipmap/ic_launcher"
        android:label="@string/app_name"
        android:roundIcon="@mipmap/ic_launcher_round"
        android:supportsRtl="true"
        android:theme="@style/Theme.ContactList"
        tools:targetApi="31">
        <activity
            android:name=".MainActivity"
            android:exported="true">
            <intent-filter>
                <action android:name="android.intent.action.MAIN" />

                <category android:name="android.intent.category.LAUNCHER" />
            </intent-filter>
        </activity>
        <activity
            android:name=".MainActivity2"
            android:exported="true">
            <intent-filter>
                <action android:name="com.ajikadev.contactlist.MainActivity2" />

                <category android:name="android.intent.category.DEFAULT" />
            </intent-filter>
        </activity>
    </application>

</manifest>
With this we can now go to the implementation of the UI layouts using Java code to bring the apps functionality to life.
Head over to the next section for that.
Writing Java code for the Contact List App
Let’s start with programming the Add Contacts button such that every time the user clicks it, he is directed from the MainActivity layout to the MainActivity2 layout. This is achieved using the Intent constructor called in the onClick method.
Note that we shall have to retrieve data entered in MainActivity2 layout and use it in MainActivity layout, by displaying it in the List View. To achieve this we use the function startActivityForResult(i, 1), where i is the Intent constructor and 1 is a positive request code: used as arguments as shown below; Copy the code and replace it with the code in MainActivity.java file;
package com.ajikadev.contactlist;

import androidx.appcompat.app.AppCompatActivity;
import android.content.Intent;
import android.os.Bundle;
import android.view.View;
import android.widget.Button;


public class MainActivity extends AppCompatActivity {

    Button btn;

    @Override
    protected void onCreate(Bundle savedInstanceState) {
        super.onCreate(savedInstanceState);
        setContentView(R.layout.activity_main);

        btn = findViewById(R.id.button);

        btn.setOnClickListener(new View.OnClickListener() {
            @Override
            public void onClick(View view) {
                Intent i = new Intent("com.ajikadev.contactlist.MainActivity2");
                startActivityForResult(i, 1);
            }
        });
    }
}
Run your app in the emulator or debugging device and you should get the results shown below i.e. be able to navigate from the first activity to the second activity layouts.
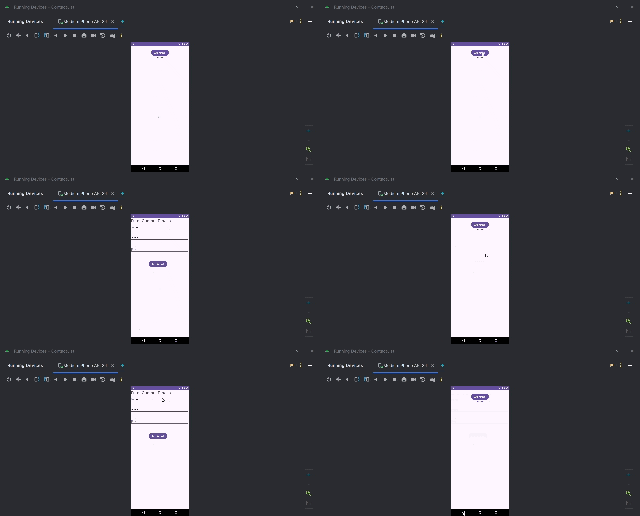
Now in the MainActivity2 layout, we are going to program the Save Contact button such that onClick, all the data received from the EditText fields for Name, Phone and Email is all passed back to MainActivity to be used and displayed in the ListView.
To achieve this, we shall use the getText().toString() on all the variables for the various EditText fields such that every data i.e. Text entered under each field is received the converted to a String using the toString() method and then give it a name variable.
Let’s call an Intent constructor and then name it resultCode and then use putExtra(“NAME_DATA”, name) to put the data into resultCode as NAME_DATA.
We then use setResult(RESULT_OK, resultCode) to set all the data ready to be passed to the previous Activity layout i.e. MainActivity.
Then we call the finish() to close the current activity and start the previous one.
The code is below;
Copy it and replace with the code in the MainActivity2.java file.
package com.ajikadev.contactlist;

import android.app.Activity;
import android.content.Intent;
import android.os.Bundle;
import android.view.View;
import android.widget.Button;
import android.widget.EditText;


public class MainActivity2 extends Activity {

    EditText nameEditText, emailEditText, phoneEditText;
    Button button2;

    @Override
    public void onCreate(Bundle savedInstanceState) {
        super.onCreate(savedInstanceState);
        setContentView(R.layout.activity_main2);

        button2 = findViewById(R.id.button2);
        nameEditText = findViewById(R.id.editName);
        emailEditText = findViewById(R.id.editEmail);
        phoneEditText = findViewById(R.id.editTextPhone);

        button2.setOnClickListener(new View.OnClickListener() {
            @Override
            public void onClick(View view) {
                String name = nameEditText.getText().toString();
                String email = emailEditText.getText().toString();
                String phone = phoneEditText.getText().toString();

                Intent resultIntent = new Intent();
                resultIntent.putExtra("NAME_DATA", name);
                resultIntent.putExtra("EMAIL_DATA", email);
                resultIntent.putExtra("PHONE_DATA", phone);
                setResult(RESULT_OK, resultIntent);

                finish();
            }
        });
    }
}
It’s now time for us to utilize the data that has been passed to the MainActivity from MainActivity2.
We want the received data to be displayed in the ListView UI component.
For a list view to display more than one item in one section as in our case, we have to create a new class called Contact.java with instance variables name, phone and email such that when adding the received data, import the Contact class, then use a new Contact object to receive the 3 details and then pass them to a single section of the ListView.
The code for the Contact Class is shown below;
package com.ajikadev.contacatapp;

public class Contact {
    private String name;
    private String phone;
    private String email;

    public Contact(String name, String phone, String email) {
        this.name = name;
        this.phone = phone;
        this.email = email;
    }

    @Override
    public String toString() {
        return "Name: " + name + "\nPhone: " + phone + "\nEmail: " + email;
    }
}
Below is the code that could help us achieve what we want;
Copy it and replace it for the code in the MainActivity.java file
package com.ajikadev.contactlist;

import androidx.annotation.Nullable;
import androidx.appcompat.app.AppCompatActivity;
import android.content.Intent;
import android.os.Bundle;
import android.view.View;
import android.widget.ArrayAdapter;
import android.widget.Button;
import android.widget.ListView;
import android.widget.Toast;

import java.util.ArrayList;

public class MainActivity extends AppCompatActivity {
    ArrayList<Contact> contacts;
    ArrayAdapter<Contact> contactsAdapter;
    ListView listView;
    Button btn;

    @Override
    protected void onCreate(Bundle savedInstanceState) {
        super.onCreate(savedInstanceState);
        setContentView(R.layout.activity_main);

        listView = findViewById(R.id.list);
        btn = findViewById(R.id.button);

        contacts = new ArrayList<>();

        btn.setOnClickListener(new View.OnClickListener() {
            @Override
            public void onClick(View view) {
                Intent i = new Intent("com.ajikadev.contacatapp.SecondActivity");
                startActivityForResult(i, 1);
            }
        });

        // Initialize contactsAdapter after contacts list is populated
        contactsAdapter = new ArrayAdapter<>(this,
                android.R.layout.simple_list_item_1, contacts);
        listView.setAdapter(contactsAdapter);
    }

    @Override
    public void onActivityResult(int requestCode, int resultCode, @Nullable Intent data) {
        super.onActivityResult(requestCode, resultCode, data);

        if (requestCode == 1 && resultCode == RESULT_OK) {
            String name = data.getStringExtra("NAME_DATA");
            String phone = data.getStringExtra("PHONE_DATA");
            String email = data.getStringExtra("EMAIL_DATA");

            Toast.makeText(getApplicationContext(),
"Bikooze: " + name, Toast.LENGTH_SHORT).show();
//Bikooze means it has WORKED in my native language

            // Create a new Contact object and add it to the contacts list
            Contact newContact = new Contact(name, phone, email);
            contacts.add(newContact);

            // Notify the adapter that the data has changed
            contactsAdapter.notifyDataSetChanged();
        } else {
            Toast.makeText(getApplicationContext(), "Biganye",
Toast.LENGTH_SHORT).show();
//Biganye means it has NOT WORKED in my native language
//It is just a message Toast I have used to check
//whether data has been passed or not.
        }
    }
}
After this, we can now get into running and testing the functionality of the app.
Running and Testing the App
Run the emulator and your application should be running as shown below;

You can go further and test the application on different devices and see how it works.
Conclusion
Wow!

Congratulations mate for we have come to the end of our step-by-step guide. Hope it was a great guide for you. In case you have any problems, put it in the comments and we shall help you out.
As promised, I have a task for you:
The task is for you to add a delete functionality every time a user long presses a given section of the ListView. To implement this, create a method for removing items from the ListView whenever there is a long press on it. For the long pressing, think of using Toast.LENGTH_LONG. Good Luck!
To understand more, I do recommend you learning more about the use of ListView here: Understand Android List View

